Thursday, 5 September 2013

RF24 with ATtiny84


An ATtiny84 and nrf24l01+ transceiver
The nrf24l01+ is an amazing little wireless transceiver which is (a) incredibly cheap (how about 10 for €8?) (b) can be put into an extremely low-power mode under software when not transmitting and (c) is controlled over SPI (available on Arduino). Furthermore Arduino has support for them via the Mirf library. Unfortunately this library isn't super-easy to use (although I've seen worse).

Luckily for us, someone called Maniacbug has produced an excellent pair of libraries (RF24 and RF24Network) which simplify use of these devices considerably, and in a manner consistent with the Arduino way. The latter library makes building meshed wireless networks very easy indeed. (If you're thinking XBee at a twentieth-the-cost, you're way ahead of me.) An RF24Network article describes the design and implementation of an impressively low-cost, whole-building, wireless sensor network scalable to thousands of sensors.

While reading about this sensor network, a question arose: why was it restricted to ATmegas? Surely an ATtiny would be equally up to the job? It turns out that I wasn't the first to think about this. One source of problems was the ambiguous nature of the SPI interface on ATtiny chips.
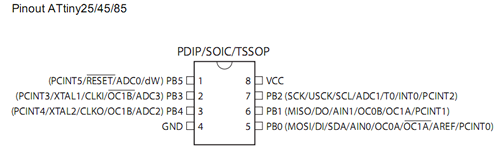
ATtiny-x5

Although these chips have pins named after SPI functions (SCK, MISO, MOSI) they are primarily for programming the chip over SPI, not for use in the SPI master role, to control other devices. However USI (for Universal Serial Interface), which can be used to implement SPI, is provided. In principle, therefore, it should be possible to talk to an nrf24l01 radio from an ATtiny, and it turns out by forking the Mirf library, it has been done.

While USI-SPI is demonstrated only for ATtiny85, mutatis mutandis it is pretty easy to make work on an ATtiny84 as well. (Blindly mapping pins by name works pretty well.) A bigger problem is that RF24 relies on the built-in Arduino SPI library, which only works on ATmegas. This library could be a poster-child for the library-dependency problem --- i.e., how to replace an underlying dependency of a library cleanly. In short, with the current Arduino library handling semantics, it's impossible: only one approach works and that's to edit it. (One small consolation is that it's not necessary to edit it in place, the IDE will search ~/sketchbook/libraries before its built-in libraries.)

My cross-platform SPI library is here, (credit is due to Nick Gammon, SPI85 and JeeLib's RF12 driver). It supports ATtiny-x4 and -x5 as well as ATmegas.


ATtiny-x4
The SPI library uses the pins marked DI/DO/USCK in each of the ATtiny pinouts linked here. (Note that DI/DO are not the same as MISO and MOSI!) For the ATtiny84, SS is mapped to PA7 (pin 6), while on the '85 it's mapped to PB3 (pin 2).

Armed with this library, and the ATtiny development environment described yesterday, it was a simple matter to compile the helloworld_tx example from RF24Network. And, while it compiled fine, it failed to link because the resulting binary was too large for the ATtiny84's 8kB code space. An inspection of the library code revealed extensive use of printf_P, which eats up a lot of flash space on an ATtiny. A quick hack with the C preprocessor and the code size was down to 5700 bytes, leaving a couple of kB for user sketches.

When connecting a radio, DO connects to MOSI, DI to MISO and USCK to SCK. CE and CSN can be set to anything reasonable (check cores/tiny/pins_arduino.c for the Arduino pin mappings).

Here are my forked RF24 and RF24Network libraries.

Wednesday, 4 September 2013

ATtiny84 Development Board

JNµ-alike
 This little board was inspired by a series of articles at JeeLabs describing how to program a JNµ from Arduino-1.5. (I tweaked a couple of values in its boards.txt but otherwise it's as described there.)

Background: since the ATtiny has no bootloader support, it can't be programmed with an FTDI cable but requires an ISP (e.g., an Arduino running the ArduinoISP example) to upload sketches to it over SPI, via avrdude (as seen below). The latest version of the Arduino IDE now supports this from within the IDE itself.
Programming it.
However I chose to add an FTDI connector because the authors of the arduino-tiny core had cunningly added a transmit-only serial emulation (on pin PB0 on the ATtiny84). (While a SoftwareSerial library which can also receive data exists, it's not yet supported on IDE 1.5.2. However I added future support for it anyway by wiring the receive line to PB1.)

Board layout
But wait, there's more! This fine article points out an alternative to ArduinoISP, which can also act as a serial relay: TinyISP. It provides two ways of doing this: by relaying SoftwareSerial and a (more robust) alternative called Knock-Bang. Each of these methods uses the SPI lines so no extra connector is required. This allows programming an ATtiny in almost the same way as an Arduino --- except you need an Arduino to act as a serial port for it!

Monday, 29 July 2013

Weather Guy


The picture shows a little Weather Station based around an ATmega328. What makes this one interesting is that it gets its weather data from Yahoo! Weather rather than a bunch of sensors. What's interesting about that (to paraphrase Dr Johnson) is that it can be done at all on an 8-bit microcontroller.

The hardware components of this system are not worth drawing a circuit diagram for:
  • Basic ATmega328 with 16MHz crystal and 22pF balancing capacitors (you know the score)
  • An ENC28J60 ethernet module (e.g., from eBay)
  • An ST7735 TFT display with SD-card (e.g., from Adafruit)
  • Stripboard, connectors, etc.
  • Err, that's it!
The software is where the real action lies. This baby (a 600+ line sketch!) crams in the following libraries:
The restrictions of the AVR chip steered the implementation in interesting directions:
  • All string constants stored in flash, using either F() or PSTR().
  • Using the TFT screen for debugging rather than Serial (saves 128 bytes RAM).
  • Graphics downloaded from Yahoo! in advance, converted into bitmaps and stored on a cheap SD card.
  • Buffer-sharing between the XML parser and reading from the SD-card. (In particular, most SD-card libraries require their own 512-byte buffer for output, see this earlier post.)
  • Reclamation of some flash on the AVR using Optiboot.
  • Displaying wind-direction without using transcendental functions (i.e., sin, cos) used the nice trick of successive rotations. (This is apparently due to the legendary Marvin Minsky, in hakmem 149.)
There is almost no free space left on the chip: just under 200 bytes of RAM (which I guess is needed for the stack) and 512 bytes of flash!

Here's another picture showing forecast data:


Saturday, 27 July 2013

Optiboot

The heart of a cheap Arduino clone is an ATmega328 chip. Often sellers of this chip will assume you're going to use it for an Arduino and burn a bootloader onto it before shipping it to you. But what if you get one without a bootloader? What if you want to use a different bootloader, for example Optiboot?

Optiboot is great: it fits inside a single 512-byte sector of flash, freeing up a (sometimes) precious 1.5kB for your programs. It allows downloading at 115200bps, also handy for large sketches. In conjunction with a 100nF capacitor between RTS and RESET, it turns your homebrew clone into an Arduino Uno (from the point-of-view of the IDE anyway).

So (adjusting your avrdude settings accordingly), firstly read the fuse bits:

$ avrdude -q -q -P /dev/ttyUSB0 -b 19200 -c avrisp -p m328p -U hfuse:r:-:h -U efuse:r:-:h -U lfuse:r:-:h
0xda
0x5
0xff

Check this online calculator for the meaning of these bits. In this case, the value of the high bits (0xda) means that 2k is reserved for the bootloader section, we're only going to need 512 bytes:

$ avrdude -q -P /dev/ttyUSB0 -b 19200 -c avrisp -p m328p -U hfuse:w:0xde:m 

Next program the optiboot bootloader (the version shipped with the Arduino IDE is in hardware/arduino/bootloaders/optiboot):

$ avrdude -q -P /dev/ttyUSB0 -b 19200 -c avrisp -p m328p -U flash:w:optiboot_atmega328.hex -U lock:w:0x0f:m

Now when you power up your Arduino clone, you should see a triple-flash on the LED on pin 13 indicating that Optiboot is ready to receive your sketches.

Monday, 15 July 2013

Accessing SD Cards from Microcontrollers

This post reviews the available choices for reading or writing FAT-formatted SD cards from Arduino and Energia over SPI. All of the libraries mentioned here support only 8.3 file-names.

Arduino ships with a library called SD, which is a wrapper (by Adafruit) around the more-comprehensive SdFat library (by William Greiman). Features of this library are:
  • FAT16 and FAT32 support on both standard and high-capacity SD cards
  • File: create, read, write, delete and truncate
  • Directory: create, read, write and delete
  • Multiple volume/partition support
The same author also provides a smaller fat16lib with features:
  • FAT16 support on standard SD cards only
  • File: create, read and write
  • Root-directory support only
Another choice for Arduino is tinyFAT (by Henning Karlsen). Its features are:
  • FAT16 on SD cards
  • File: create, read, write, rename, delete (ASCII and Binary I/O)
  • Root-directory support only, only one file open at a time
Energia, on the other hand ships with a C++ wrapper around a lower-level C-library (by ChaN) called FatFs. This is aimed at embedded systems generally and has broadly similar functionality to SdFat but also supports:
  • Multiple underlying storage technologies (e.g., SD, ATA, USB and NAND)
  • File-system creation
  • Permissions and timestamps
Petit FatFs is a subset of FatFs for 8-bit microcontrollers with limited RAM. Its features are:
  • FAT16 and FAT32 support
  • File: open, read, streaming-read, seek
  • Directory: read
  • Single volume and single file
Petit FatFs also allows features which are not required to be conditionally-compiled out (e.g., FAT32 and directory support). It also allows other libraries' low-level SPI functions to be used, to reduce code-size.

Since FatFs and Petit FatFs were originally Arduino libraries, they can be used on both Energia and Arduino. The converse is not true of FatFs.

An important point which is not obvious is the RAM footprint required. With the sole exception of Petit FatFS, all of the libraries mentioned allocate a static 512-byte buffer --- this is the sector-size of an SD card. 

Saturday, 8 June 2013

SqueezePlug LCD

Radio 4, where else?
The picture shows an lcd2usb clone attached to a SqueezePlug server running on a Raspberry Pi. It is housed in a perspex box, retrieved from a workplace bin, in which an Apple Magic Mouse was shipped. (Perspex boxes from Apple make great project housings!) The media server communicates with it via lcdproc and a homebrew perl script, made significantly simpler by the fact that both lcdproc and the Logitech Media Server provide command-line interfaces. The two switches allow playback to be paused and stopped, respectively.
Samsung Camera awesomeness!

While its firmware was used unchanged from lcd2usb, the hardware was simplified by removing the programmable contrast control, support for multiple display types and for in-system programming. Another change was necessitated by the fact that the display used (a JHD204A), while claiming to be HD44780-compatible, has its contrast and Vcc pins (2 and 3) swapped.

The circuit was assembled in typical 'backpack' style on a piece of stripboard. A nice feature of this display is that it provides connector pins at the top and bottom, allowing functions to be connected to whichever edge is most convenient. The layout was performed manually with pencil and grid-paper as shown below.

Friday, 19 April 2013

Cheap TFT Displays

The photo shows a (very) cheap 2.4" TFT LCD/SD/Touchscreen combo purchased (as always) from China, via eBay and PayPal. (Love those blemishes!) Here is what the manufacturer thinks it can do:

This device is a parallel TFT display, unlike the SPI one discussed previously. Its bus can be either 8 or 16 bits wide. Even in 8-bit mode it uses up a whopping 12 I/O pins.

It is well supported (on Arduino anyway) by Henning Karlsen's excellent UTFT library. In the picture it is running the UTFT_Demo_320x240 (configured as S6D1121_8, should you care). However you should follow his advice and edit memorysaver.h in order to comment out all of the other devices supported by this excellent library. Even so, the sketch comes in at over 25kB (and you have to partially disconnect it before upload if you have a USB-Serial Arduino-alike because two of those I/Os belong to the hardware serial port).

So this device pretty much maxes out an ATMega328. About the only application I can imagine for this combination is some sort of digital picture frame with touch-swiping. Even then it would be a tight squeeze to get the sketch and the further SD and UTouch libraries in under 32kB --- and that's without reckoning on the I/Os needed to drive the two extra devices.