Showing posts with label attiny. Show all posts

Thursday, 24 September 2020

Tinysensors Redux


Raspberry Pi Zero-W with Tinysensor Hat

It is often instructive to revisit an old project: you never know what you might see with fresh eyes. Such is the case with Tinysensors, which has featured here several times over the years. Since it lives in Github I use that platform's Issues feature to collect ideas which pop into my head when I am otherwise occupied. This provides a nice context from which to start revisiting.

Among the issues addressed since the last time we featured this project are:

  • Switching to the ATTinyCore. From my point of view, the most important feature of this great project is its support for Optiboot. This decreased the testing time for changes to the Tinysensor sketch by an order of magnitude. No more external programmers!
  • Removing the RF24Network library. This supports a very versatile model of organising nRF24L01+ radios into a fully-connected 5-way tree. However it necessarily limits the number of leaf sensors to 5, requiring bridges to interconnect different levels. A star topology removes this limitation, and also reduces the code footprint enough to support debugging via SoftwareSerial.
  • Reducing power-drain. With the above improvements in testability, it didn't take long before a gotcha in power consumption was spotted: a voltage divider made with a built-in pullup resistor consumes current even during SLEEP_MODE_PWR_DOWN!
  • Moving the hub to Raspberry Pi Zero W. This has more memory and more processor for smaller footprint; in addition to built-in WiFi and Bluetooth. Once that was complete, a proper Hat was designed to hold the nRF24L01+ radio and status LEDs... and a power button, just 'cos.
  • Outsourcing the RF24 library to nRF24. These guys have put a lot of work into improving the performance of Maniacbug's excellent original library, which means I don't have to!
Future work? A nice next step might be to redesign the sensor PCB for a coin-cell and surface-mount components. However I'm pleased enough with these changes to park it for another couple of years!

Wednesday, 17 July 2019

At the Margin

(Who knew that the Economics of Seinfeld was a thing? Given that it was the first link returned by Google, everyone but me I guess!)

The idea of "marginal cost" is usually in mind when I'm preparing a PCB order from Seeed Studio. That's because their product is cheap and high quality but shipping rates are high. This means that it's almost free to load up an order with small items which would not of themselves justify the total cost.

This post describes a couple of such items, which gave me practice (I'm learning KiCad) yet took no longer than a few hours to produce.

The first of these is a breakout board for the (pre-ESP8266 anyway) ubiquitous nRF24L01 radio module. Its main advantage is its low power, allowing projects using it to run off batteries. Its main disadvantage is its breadboard-hostile pinout. Enough said: see picture below.
nRF24L01 breakout
Sparkfun does something similar; however theirs is better, and more expensive! I kept mine pin-compatible though, because why not?

Next up is a breadboard-friendly development board for the attiny84. This had been on my maybe-list for a while but it was only when I discovered Spence Konde's awesome Arduino core for ATtiny that I decided to go for it. The presence of Optiboot sealed the deal for me: the pin header allows sketch upload via a standard FTDI dongle.

attiny84 devboard
Lastly, just to show that they both play nicely together, the pair wired up, and programmed with a sketch using my ATtiny port of the RF24 library (originally written by Maniacbug of course).
All together now!

Friday, 6 October 2017

Autumn Update

Some recent updates on the Github:

  • Interrupted is now compatible with the Arduino (1.8.4 and above) and Energia (18 and above) IDEs. However you have to cut-and-paste the examples, for now.
  • Tasks is also compatible with the Arduino and Energia IDEs, and (maybe) PlatformIO. Ditto caveat about examples.
  • uC-Makefile has been updated for the latest Arduino and Energia IDEs. Unfortunately Energia has discontinued support for the Stellarpad, so this option is now busted.
  • invaders now compiles under Energia 17, the last release to support Stellarpads.
  • WeatherGuy has had an ESP8266 refresh as WifiWeatherGuy. Stay tuned for more information on that.

Friday, 26 August 2016

A Tinier Tiny

Now even tinier!
The photo shows an upgrade to last year's tiny ATtiny development board: now even smaller and with fewer components but with better breadboard performance!

The schematic and board layout (for Eagle) along with gerbers can be found here. The pcb (from Seeed, 1€) was cut down to size with a Dremel.

Monday, 11 May 2015

Interrupted

Interrupted is a new approach to developing low-power, low-latency Arduino sketches, which was motivated by two observations:
  • That the default mode of programming for Arduino is busy-waiting, and
  • The runtime support for power management provided by avr-libc is basic, being charitable to it.
Taken together, these two points mean that Arduino sketches aren't easily battery-powered, while the second results in a cargo-cult of code copying. Lastly, timed sleep in Arduino is provided by delay(), which itself is busy-waiting. This increases latency, the response time to external events such as button-presses.

And so to an example; the sketch below manages a very simple hardware configuration composed of an ATtiny85, an LED and a button: the button turns the LED on and a timer turns it off again. (You could imagine such a sketch driving a Useless Machine.)

In the main loop, the CPU sleeps in select(), waking up when an event occurs on one of the devices it manages. Three events are possible here:
  • An external interrupt which occurs when the button drives pin PB2 low,
  • A pin-change when the LED on PB0 is turned on or off,
  • When the watchdog timer fires, one second after the LED comes on.
The value returned from select() indicates which event has woken it up, allowing the concise construction of state-machines. If more than one event source is ready, the one added earlier in setup() is returned, implementing a crude form of priority.

The sleep-mode entered by select() is the maximum which makes sense for the devices currently active. In this little example, SLEEP_MODE_PWR_DOWN will be chosen because external and watchdog interrupts still work in this mode.

Much credit is due to Nick Gammon, for the great work contained in his Interrupts and Power Saving Techniques for Microprocessors forum-pages.

Very similar techniques were employed in the runtimes of the Conic and Regis environments developed at Imperial College (as well as the select system call, of course).

The library has been ported to ATtiny84, ATtiny85 and ATMega328 processors and is, as always, at GitHub. Its code footprint varies, depending on the functionality required by individual sketches, but the little example above comes in at 2.5kB.

Work remains to be done on this library including porting it to Energia (i.e., the msp430 family), porting existing sketches to use it and completing the repertoire of supported devices (e.g., SPI handling).

Wednesday, 11 March 2015

A tiny ATtiny

Very tiny!
 Recently I was surprised to discover that although I've made several projects using one, I'd never built a development board around the ATtiny85. With any project there are always design choices and a couple of important ones here were:
  • Is a breadboard optional or required? If optional, you get the familiar Arduino form-factor, which can either be connected to a breadboard using jumper cables or populated with pre-built shields.
  • Design a PCB or something more ad hoc? I wanted something quickly --- I wasn't going into competition with the Teensy or Trinket.
  • If not designing your own PCB, use stripboard or protoboard? While I've never been a huge fan of protoboard, because you're basically making your own strips by blobbing solder across pads, you can get quite a high component density with it.
So I opted for the path not taken, requiring a breadboard and using protoboard, and the result is pictured above. Notice that protoboard allows the FTDI connector to be attached at right-angles to the chip (try that with stripboard!) and also exposes more of the breadboard for jumper cables (the 10k resistor connecting reset and Vcc is underneath the chip).

With the ever-useful Tiny-Safe-Boot bootloader and a bespoke entry in my arduino-tiny's boards.txt file, it's as easy as regular Arduino, at a fraction the cost!

Thursday, 31 July 2014

RF24 and ATtiny, now with added debugging!

Last time's throwaway comment about the potential to use plain-old Serial.print() instead of printf() for debugging RF24 on constrained platforms turned into an itch that had to be scratched. The latest versions of RF24 and RF24Network on the GitHub have a bunch of improvements:

  • RF24Debug (and RF24NetworkDebug) now extend the non-debugging classes,
  • Their constructors take a Print object which defaults to Serial,
  • Their implementations use plain-ol' Print.print() throughout,
  • An ATtiny example, tinypingpair, has been added.
You've seen it all before, but hey!
The upshot of all this is that simply replacing the declaration of RF24 by RF24Debug in your sketch causes all sorts of debugging to be written to the serial port, even on ATtiny!

A nice side-effect is that debugging can be directed at anything which implements the Print interface, for example, anything which extends Adafruit's GFX library, i.e., their LCD screens.

Note that tinypingpair with debugging now takes up 99% of the available space on my ATtiny development board (there would be slightly more room without a bootloader). In spite of that, this work remains useful, helping beginners get started with this nice combination of radio and microcontroller.

Update: I've just verified that debugging works on the Fraunchpad with the new scheme, noting the usual caveat about timeouts.

Friday, 25 April 2014

Power Consumption

Initial news on the power consumption of a TinySensor just in! A sensor was configured to transmit every 5 seconds until its battery ran down; it managed 1205331 transmissions in just under 70 days on a Duracell AAA Plus. Therefore, if configured to transmit once per minute, it would have lasted for 2 years and 4 months.

This handy page informs us that a long-life AAA Alkaline battery contains about 5kJ of energy, therefore each transmission takes about 4mJ, which equals an average power consumption of 0.8mW. At an average voltage of 3v this requires a current of about 0.26mA. Ignoring consumption by the sensors and boost converter, and estimating current drawn by the radio and processor combined at 25mA, gives a duty-cycle of 1:100, meaning it's awake for 50ms.

Voltage over time looks like this, which seems typical for Alkaline batteries; it jumps around quite a bit at the end, and the interval between transmission times increases considerably.
During normal operation there is a bit of variation between successive readings, I'm not sure whether this is just due to thermal fluctuations or an artifact of the ATtiny's ADC.

The starting battery voltage was logged at an unsurprising 1.51v but the last reading received was an astonishing 0.28v! This shows the amazing ability of the step-up voltage converter to suck every last drop of juice out of a battery. Here we have zoomed in on the end of its life:
Each transmission carries a message-ID which should be monotone increasing, within the limits of its range. The next plot shows that the TinySensor worked perfectly (or at least didn't reboot) for most of its run (and also that the message-ID is 16-bits unsigned):

However, towards the end of the battery's life, this is certainly not the case:

Here we zoom in still further on the system's behaviour at the end of the battery's life:
It is clear that the system halts for increasingly long periods of time while the battery recovers, then it manages a few hundred transmissions before collapsing again. We can look at the time interval between messages on the same time axis as the plot above:
Noticing the change in the slope of the message ID line above, let's zoom in on the corresponding part of the inter-arrival time graph:
Note that this is the time at which the message was written to the database on the Raspberry Pi, so some variation must arise from the behaviour of the Linux kernel on that box, however it's not clear what to make of the rising trend in the graph from about 03:37 onwards. (The processor used its Watchdog timer to sleep; this is clocked using its own 128kHz RC-oscillator so perhaps the falling supply voltage is causing time to dilate!)

Update:

A little experiment with an ATtiny, a blinking LED and an almost-exhausted battery disproves the hypothesis that the watchdog timer is losing time: the blink-rate remained constant until the battery died. Furthermore a voltmeter attached to the battery confirmed that it fluctuated up and down by about 10mV during the sketch's blink cycle.

Update 2:

An important lesson from this kind of experimentation is to keep as many sources of time as possible. We've seen the inter-arrival time above, but what about the transmission time as seen by the sensor? Below is a plot of the inter-transmission time, as recorded by the millisecond timer on the ATtiny:
What is really interesting about this is that all of the noise in the inter-arrival times has vanished! As far as the ATtiny is concerned, there are only 4 distinct intervals between packets: 5s (as intended), 10.45s, 15.9s and 21.4s. My best guess for this is that the radio has only succeeded in transmitting one out of every two, three and four packets respectively. Lastly, the steadily rising inter-arrival time is most likely due to radio-level retransmissions, required due to diminishing transmission signal power.

Friday, 7 February 2014

The Next Level

The PCB and TinySensor assembled!
A mere three weeks after submitting the order, Seeed Studio returned my PCBs! The picture above shows one before assembly and the other after. The assembled one is mounted on half of a sick-of-beige case, also from Seeed Studio. This was needed because the PCB chosen was 0.8mm thick and flexes easily. (Perhaps a thicker PCB wouldn't have this problem.)

Assembling a PCB is much easier than stripboard mainly because of the smaller number of holes on offer for each part. Printing the component names helps too but not having them wouldn't have mattered so much, for this project anyway. The main thing to remember is to add the parts in increasing order of height.

The board worked first time! No embarrassing green wires needed! I attribute this to the fantastic job done by Eagle's autorouter. The only change I would make in retrospect is to ensure the capacitors were the right physical size: the parts chosen from Eagle's library had a smaller footprint than the ones eventually used. The Eagle files are here.


Quick-and-dirty graphs of humidity and light from the bathroom over the past 8 hours. (Note the spike at 9am when I was showering!)

Here's the bill-of-materials. Say €20 including headers, nuts-and-bolts, AAA battery, etc.
PartQty€
ATtiny84 1 3.00
14-pin DIL 1 0.15
PCB 1 4.50
Sick-of-Beige Case 0.5 1.00
DHT22 1 3.50
NRF24L01+ 1 1.00
NCP1402 3v3 1 5.00
100nF 3 0.05
10k 2 0.05
4k7 1 0.02
Total 18.27

Thursday, 16 January 2014

Taking it to the Next Level

TinySensor Board Layout
Up till now we've just used Eagle to draw schematics and, in all honesty, it's not the world's greatest drawing tool. It only really comes into its own when used as it was intended, to assist the complete design process.

What follows is a summary of my experience using Eagle to lay out the TinySensor circuit, described previously, on a sub-credit-card-sized board and generate the files required to fabricate the board. (It's based on a reading of these two useful posts.)

So, once a circuit has been designed and prototyped on breadboard/stripboard, its schematic drawn and checked for errors (using the ERC tool in Eagle), board layout can begin. Unsurprisingly this involves Eagle's "Switch to Board" menu item. A new window appears with a jumble of interconnected footprints corresponding to the components chosen in the schematic view.

The board view is connected to the schematic so that any changes to the latter are reflected in the former. The first changes might be to replace some components by equivalents with different footprints, for instance (and Eagle provides a tool for just this purpose).

However the main action of this view is layout, routing and manufacture. Layout must be done manually, by dragging individual components out of the jumble and into the white rectangle, representing the board itself. At this stage, I chose the board above (it's from Dangerous Prototypes) and deleted the white rectangle. A good rule of thumb is to place the largest parts first, although you'll probably have a good idea of the desired relative positions of the parts, having prototyped it already on stripboard.

It's good practise to try manually routing the circuit, if only to be even more amazed at what a good job the autorouter does. The undo command is your friend here: I found it useful to try autorouting slightly different placements, undoing autorouting before moving components around.

Once satisfied with the placement, print the layout on paper! This provides an essential sanity check of component footprints: use a pin for the drill holes and attempt to fit your chosen parts. Better to discover they don't fit at this stage than when the boards come back from the fabricator!

The next step is to run a Design Rules' Check. This often requires a rules' file tailored to the fabrication process itself, in this case Seeed Studio's Fusion PCB Service. Download the rules' file, load it from the DRC dialog and run the check. This thread contains descriptions of some errors found at this point.

Finally, run the CAM Processor to generate the design files for manufacturing. (For Seeed Studio, this requires its own Gerber Generator, downloadable from the second step of the Fusion PCB workflow.)
At the CAM Processor dialog, load this file from File > Open > Job... and then hit Process Job. This will generate a bunch of files, of which Seeed requires 8:

% zip seeed.zip sensors.{GTL,GBL,GTS,GBS,GTO,GBO,TXT,GML}

A sanity-check widely recommended at this stage is to load up the layer-files above using a separate tool (e.g., gerbv) to see if there is a discrepancy between it and Eagle and correct it. Once this is done, upload the zip file, pay your money and wait!

Wednesday, 15 January 2014

TinySensor (part 1)

TinySensor circuit diagram
Remote sensing using microcontrollers is nothing new --- it is practically a rite of passage. My spin on it, TinySensor, can be seen above. It's a wireless, battery-powered device which periodically transmits readings of light, temperature, humidity and its own battery voltage, to a base station comprising a Raspberry Pi and a MySQL database. Unusual features of this sensor are:
Resources:

Sunday, 10 November 2013

ATtiny Development Board... now with added Bootloader!

Not long after writing about how ATtinys have no bootloader support, I came across Adafruit's Trinket, an obviously-bootloaded ATtiny85! However as this board's USB bootloader consumes over 2.5kB of flash, it could not coexist with wireless networking in the form of the RF24 library I'm interested in (which leaves only 2.5kB free after inclusion).

Nevertheless, googling "attiny bootloader" turns up several interesting links, notably TinySafeBoot. This is both tiny (550 bytes) and safe (providing password support). Its size means there's still almost 2kB left free in my desired configuration which I expect should be enough for some interesting wireless sensing applications --- stay tuned for more on that.

TSB, which is GPL-licensed, comes with a generic AVR bootloader blob which it tunes for your target hardware, rather than requiring messing with makefiles and building-from-source. In the case of our ATtiny development board, the desired target is an ATtiny84 with pins PB1 and PB0 connected to software-serial Rx/Tx:
% ./tsb tn84 b1b0  # generates tsb_tn84_b1b0_20131023.hex
The resulting bootloader can now be uploaded to the development board using an external programmer. Thereafter TSB talks to the bootloader to upload programs:
% ./tsb /dev/ttyUSB0 FW Blink.cpp.hex
(The bootloader auto-detects the bit-rate which the uploader is using; here I'm just taking the default of 9600B.)

The obvious next step is to integrate TSB into the Arduino IDE, building on the Jeelabs' work to obtain an environment indistinguishable from a normal ATmega-based Arduino; it would simply replace that part of platform.txt, specifying tsb, with appropriate flags, as the uploader.

Unfortunately, I think due to the way tsb handles its input stream, it doesn't take kindly to being called from a script; it's written in freebasic, maybe it's a feature of that platform. So, with the help of strace, I wrote a one-shot firmware uploader in C (gist here) callable from the Arduino IDE.

Now I can upload sketches from the Arduino IDE to my ATtiny development board without any additional hardware! The 'burn bootloader' functionality also works (with the aid of an external programmer) to burn fuses and install the custom firmware file generated above. My fork of Jeelabs' repository is available here, just clone it into your sketchbook/hardware folder.

The only hardware modification I made to my development board was the addition of a series 100nF ceramic capacitor between reset and DTR, to reset the ATtiny when the IDE wants to upload a sketch via FTDI.

Update

A diagram showing the pin names of the ATtiny84 in the Arduino IDE:
Here's a circuit diagram:
The schottky diode acts as a block to allow the board to be powered from an external battery. In this mode, the LED is disabled and no reverse current flows through the regulator. A schottky diode was used because of its low forward voltage drop (0.4v); an ordinary diode would drop the 3.3v supply to 2.6v. (Maybe that's why 3.6v regulators exist!)

Thursday, 5 September 2013

RF24 with ATtiny84


An ATtiny84 and nrf24l01+ transceiver
The nrf24l01+ is an amazing little wireless transceiver which is (a) incredibly cheap (how about 10 for €8?) (b) can be put into an extremely low-power mode under software when not transmitting and (c) is controlled over SPI (available on Arduino). Furthermore Arduino has support for them via the Mirf library. Unfortunately this library isn't super-easy to use (although I've seen worse).

Luckily for us, someone called Maniacbug has produced an excellent pair of libraries (RF24 and RF24Network) which simplify use of these devices considerably, and in a manner consistent with the Arduino way. The latter library makes building meshed wireless networks very easy indeed. (If you're thinking XBee at a twentieth-the-cost, you're way ahead of me.) An RF24Network article describes the design and implementation of an impressively low-cost, whole-building, wireless sensor network scalable to thousands of sensors.

While reading about this sensor network, a question arose: why was it restricted to ATmegas? Surely an ATtiny would be equally up to the job? It turns out that I wasn't the first to think about this. One source of problems was the ambiguous nature of the SPI interface on ATtiny chips.
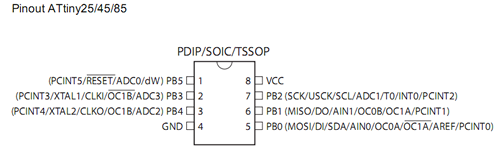
ATtiny-x5

Although these chips have pins named after SPI functions (SCK, MISO, MOSI) they are primarily for programming the chip over SPI, not for use in the SPI master role, to control other devices. However USI (for Universal Serial Interface), which can be used to implement SPI, is provided. In principle, therefore, it should be possible to talk to an nrf24l01 radio from an ATtiny, and it turns out by forking the Mirf library, it has been done.

While USI-SPI is demonstrated only for ATtiny85, mutatis mutandis it is pretty easy to make work on an ATtiny84 as well. (Blindly mapping pins by name works pretty well.) A bigger problem is that RF24 relies on the built-in Arduino SPI library, which only works on ATmegas. This library could be a poster-child for the library-dependency problem --- i.e., how to replace an underlying dependency of a library cleanly. In short, with the current Arduino library handling semantics, it's impossible: only one approach works and that's to edit it. (One small consolation is that it's not necessary to edit it in place, the IDE will search ~/sketchbook/libraries before its built-in libraries.)

My cross-platform SPI library is here, (credit is due to Nick Gammon, SPI85 and JeeLib's RF12 driver). It supports ATtiny-x4 and -x5 as well as ATmegas.


ATtiny-x4
The SPI library uses the pins marked DI/DO/USCK in each of the ATtiny pinouts linked here. (Note that DI/DO are not the same as MISO and MOSI!) For the ATtiny84, SS is mapped to PA7 (pin 6), while on the '85 it's mapped to PB3 (pin 2).

Armed with this library, and the ATtiny development environment described yesterday, it was a simple matter to compile the helloworld_tx example from RF24Network. And, while it compiled fine, it failed to link because the resulting binary was too large for the ATtiny84's 8kB code space. An inspection of the library code revealed extensive use of printf_P, which eats up a lot of flash space on an ATtiny. A quick hack with the C preprocessor and the code size was down to 5700 bytes, leaving a couple of kB for user sketches.

When connecting a radio, DO connects to MOSI, DI to MISO and USCK to SCK. CE and CSN can be set to anything reasonable (check cores/tiny/pins_arduino.c for the Arduino pin mappings).

Here are my forked RF24 and RF24Network libraries.

Wednesday, 4 September 2013

ATtiny84 Development Board

JNµ-alike
 This little board was inspired by a series of articles at JeeLabs describing how to program a JNµ from Arduino-1.5. (I tweaked a couple of values in its boards.txt but otherwise it's as described there.)

Background: since the ATtiny has no bootloader support, it can't be programmed with an FTDI cable but requires an ISP (e.g., an Arduino running the ArduinoISP example) to upload sketches to it over SPI, via avrdude (as seen below). The latest version of the Arduino IDE now supports this from within the IDE itself.
Programming it.
However I chose to add an FTDI connector because the authors of the arduino-tiny core had cunningly added a transmit-only serial emulation (on pin PB0 on the ATtiny84). (While a SoftwareSerial library which can also receive data exists, it's not yet supported on IDE 1.5.2. However I added future support for it anyway by wiring the receive line to PB1.)

Board layout
But wait, there's more! This fine article points out an alternative to ArduinoISP, which can also act as a serial relay: TinyISP. It provides two ways of doing this: by relaying SoftwareSerial and a (more robust) alternative called Knock-Bang. Each of these methods uses the SPI lines so no extra connector is required. This allows programming an ATtiny in almost the same way as an Arduino --- except you need an Arduino to act as a serial port for it!

Saturday, 1 September 2012

USB IR Receiver


This is a little USB infrared receiver based on an original design by Ben Ryves. It pretends to be a USB keyboard and works by mapping NEC IR codes to keystrokes --- controlling the chosen application through its keyboard shortcuts. (VLC is a good choice of application because it's possible to change its shortcuts to match the ones sent by the receiver.)

I slightly simplified the hardware removing a switch which the original used to send different sets of key-codes, for two applications without programmable shortcuts. The modified circuit diagram is below.
(Note that the circuit must run at 12 MHz. I think this was due to the timing of the IR reception routine.)

I also simplified the software, removing a detection routine for the SIRCS protocol. Ben's original software is here, while my modifications are here.  The USB stack is V-USB: this is a nice simple example of getting started with it.

The software detects codes sent by a Newsky DVB-T remote control, seen below.
An easy way to discover the type of your remote control and the codes it sends, is with Ken Shirriff's handy IR library for Arduino; use the IRrecvDump sketch.

Monday, 30 January 2012

Twilight Mk2


The picture shows an updated version of Twilight driving a 3W LED inside a salt crystal. The new circuit:
  • does away with the LEDs, using the controlled light itself as an indicator,
  • ditches the variable resistor, using a long-press on the switch to indicate the light-level at which to switch on,
  • stores this light-level in EEPROM to preserve it across power cycles
  • uses an ATtiny85 for a smaller footprint
When switched on for the first time, the light is flashed quickly four times. When the environment reaches the desired level of twilight, the user presses the switch for two seconds to indicate this light level is to be stored. The light is then flashed slowly twice.

A circuit diagram and sketch (for Arduino 1.0) are shown below.


Friday, 12 August 2011

Twilight


The circuit above implements a light switch which is activated by darkness and movement, using an LDR and a PIR sensor respectively. It draws its power from the voltage it's switching, using a 7805 voltage regulator (on the left). A manual override switch is also provided.

The sketch below implements the brains of this circuit. Highlights are:
  • It smooths the light reading using an array of samples to prevent accidental triggering.
  • Hysteresis also helps with this, a light reading below the light threshold is definitely daylight, while one above the dark threshold is definitely night-time.
  • The light level is tunable using a potentiometer, when it's between the light and dark thresholds, an LED is lit indicating dusk.
  • Another LED is lit, using the signal from the PIR, when motion is detected. This is useful when positioning the box in daylight!
  • A manual override is provided to turn on the light for half an hour when it's daytime, and turn it off for 15s at night-time. (The latter allows the light to be turned off and the operator time to get out of the way.)
Several iterations were required to get the switching behaviour just right for the way it was to be used (in a kitchen). Had it been implemented using discrete hardware, it would not have been so easy to make these changes.


Wednesday, 13 July 2011

Observations on the ATtiny44

Back here, where I discussed Arduino IDE support for the ATtiny core, I mentioned that I didn't think the -44 was properly supported (although I'd had success with the -84); since then I've confirmed this.

I became sure that the source of the problem was just the various switches passed by the IDE to the native compiler and linker after a day's fiddling with them (you can inspect them by starting the IDE from a shell) and soon afterwards, rather than writing one of my own, I discovered Martin Oldfield's excellent Makefile.

In order to use it, I had to tweak it a bit (you can find my version here), principally to produce, and link against, an Arduino core library; Martin's version links all of the objects into the final image which made it too big for the -44.

One last -44 hint: never use floating-point mathematics: since none of the AT chips has a floating point unit, gcc has to insert software floating-point operations which are not cheap! They add about 1.5kB to the final image, leaving very little space for your precious program!

Tuesday, 10 May 2011

In-System Programming


This post describes how to use an Arduino (or compatible, as described earlier) to program an AVR, specifically the ATtiny84. I used this page as a starting-point, although it talks about programming an ATmega, the principle is the same.

I chose the ATtiny because it is a convenient package for standalone applications (14-pin DIL) yet provides 8k of flash and lots of I/O (up to 12 pins).

The first step is to download mega-isp into the Arduino IDE and upload it to the Arduino, thus turning it into an ISP. Then wire up the ATtiny as shown in the picture above. The connections between the Arduino and the ATtiny are as follows:


ArduinoATtinyATMegaName
1417Vcc
16148Gnd
13919SCK
12818MISO
11717MOSI
1041/RESET

Also connect the reset pin to Vcc via a 10k resistor and don't forget the 100nF capacitor between Vcc and Gnd.

Status LEDs can optionally be connected as follows:

ArduinoFunction
9Heartbeat
8Error
7Programming

Out of the box, the Arduino IDE supports only ATmega chips. To rectify this, download and install arduino-tiny. Then start the IDE, select Tools > Board > ATtiny @ 1MHz, and compile the sketch to be written to it.

Next, open a shell, find the IDE's working directory (on Linux this is somewhere like /tmp/build8471417854754086173.tmp) and cd into it. Run the following command:
$ avrdude -P /dev/ttyUSB0 -b 19200 -c avrisp -p t84 -U flash:w:Blink.cpp.hex:i
This command writes the output of the compiler (Blink.cpp.hex) at the given baud-rate (19200) to the ISP on the specified port (/dev/ttyUSB0) for the specified part (t84, for an ATMega, m328p). If successful, its output should look something like this:

$ avrdude -P /dev/ttyUSB0 -b 19200 -c avrisp -p t84 -U flash:w:Blink.cpp.hex:i

avrdude: please define PAGEL and BS2 signals in the configuration file for part ATtiny84
avrdude: AVR device initialized and ready to accept instructions

Reading | ################################################## | 100% 0.04s

avrdude: Device signature = 0x1e930c
avrdude: NOTE: FLASH memory has been specified, an erase cycle will be performed
To disable this feature, specify the -D option.
avrdude: erasing chip
avrdude: please define PAGEL and BS2 signals in the configuration file for part ATtiny84
avrdude: reading input file "Blink.cpp.hex"
avrdude: writing flash (752 bytes):

Writing | ################################################## | 100% 1.53s

avrdude: 752 bytes of flash written
avrdude: verifying flash memory against Blink.cpp.hex:
avrdude: load data flash data from input file Blink.cpp.hex:
avrdude: input file Blink.cpp.hex contains 752 bytes
avrdude: reading on-chip flash data:

Reading | ################################################## | 100% 1.35s

avrdude: verifying ...
avrdude: 752 bytes of flash verified

avrdude: safemode: Fuses OK

avrdude done. Thank you.

The ISP's LEDs will blink during this process and the ATtiny will restart when the process has completed, running the newly uploaded sketch.

Note that this does not burn the Arduino bootloader to the chip. Modifications to the sketch require this procedure to be repeated, which is rather laborious.