Friday, 29 March 2013

Prototyping Shield

The picture shows a nifty little 5v TFT-display and SD-card combo purchased on eBay for about €10. It is almost identical to an Adafruit product costing twice as much and since it uses the same chip (the ST7735R, should you care) it's compatible with Ladyada's library. (In fact, the Adafruit tutorial is also useful: the sole difference is that the cheapie's backlight pin should be connected to ground, rather than +5v.)
However the star of this show is the little rapid-prototyping shield shown above. It's primary purpose is to be a sort of breadboard substitute for those components which are unbreadboardable, e.g., larger TFT displays with two rows of pins, such as this one:
One way to play around with one of these guys is to solder two rows of male headers at either the left or right sides and connect it to a breadboard (or Arduino) via jumpers. However this ties up your breadboard  (or Arduino) for the duration of the experiment, which for the committed hobbyist, can be indefinite. With one of these handy shields, a slightly more permanent home can be made for your device for much less than the cost of a breadboard!

Sunday, 10 February 2013

Heroic Failures: Voice of TicBot

A project such as Magic Mouth (spotted at Dangerous Prototypes) is a fine example of the surprising power of the ATMega chip. With the addition of a simple audio amplifier and the impressive Webbotlib, your humble 8-bit microcontroller can turn English text into speech!

My first attempt at a project with a similar setup simply read text from the serial port and converted it into speech. (You can find the amplifier circuit schematic and Webbotlib code at Github here, it differs from Magic Mouth mainly by not depending on an external Arduino to supply the text to be spoken.) Here is a picture of it in all its homebrew glory; the amplifier is the little board piggybacking the Arduino clone, the 8-pin chip in the middle is an LM386.


Around the same time, I came across an article about a piece of software which tweeted tics: TicBot. While more Eliza-with-Tourettes than major AI breakthrough, it can be very funny:
Under the influence of Xmas cheer, an idea was born... Voice of TicBot! It would be a humble Arduino connected to Twitter by Ethernet, speaking TicBot's words of wisdom in a robot voice! How hard could that be?

The first obstacle was Twitter's use of OAuth; while this solves the problem of third-party web-application authentication, it is a pain for a device without a traditional UI. Thankfully the good people at supertweet.net have solved this problem, providing an OAuth proxy for Twitter to which devices authenticate themselves using good ol' Basic Auth.

It was then quite straightforward to write a little sketch which polled api.supertweet.net every 10 minutes for TicBot's timeline (using JeeLabs' handy Ethernet driver) and grubbed through the response for the id and text fields; no space for a fancy JSON parser here!

The next problem was how to combine the two applications? One an Arduino sketch (in C++) and the other a Webbotlib application (in C). Neither the option of porting the Ethernet driver to Webbotlib nor that of porting the relevant parts of Webbotlib to Arduino was particularly appealing. Moreover the combined size of the two applications exceeded the flash memory limit of the ATMega-328!

Fortunately a solution turned up in the shape of an Arduino port of Webbotlib's text-to-speech module, TTS. (This was a lucky piece of googling --- my Romanian is non-existent.) It required some work because my amplifier expected its PWM input to come from pin 3 whereas the TTS module emitted it on pin 10, which was needed for the Ethernet SPI. Adding the required functionality for PWM on pin 3 was achieved with the help of a nice online tutorial. An Arduino library updated for version 1.0 and with this functionality and some more examples (including the sketch for VoTB) can be found here.

With these problems solved, Voice of TicBot was finally operational! Unfortunately it was also a failure: the gnomic nature of TicBot's utterances combined with the low quality of the speech rendition made it necessary to visually consult twitter.com whenever output was heard! Here's an example of its output.

(All of this reminds me of a (possibly apocryphal) story about Stephen Hawking's first speech synthesizer: his students were pressed into service as translators, due, one assumes, to their familiarity both with the subject matter and the machine's vocal stylings.)

Friday, 14 December 2012

Ethernet!

Sure Electronics sells a cheap ($10) SPI Ethernet module based on the ENC28J60 controller. This is a different controller to the one in the Arduino Ethernet shield so isn't supported out-of-the-box by the Arduino IDE. (Interestingly it has no hardwired MAC address: you supply your own, the thinking presumably being that the odds of picking one already on your home LAN are effectively zero.)


I soldered a 6-way male connector to the small connector at the opposite end of the board from the RJ11 socket and stuck it in a breadboard for testing. Since this is an SPI device, only four connections are needed to the Arduino, besides power:

ArduinoSPIENC28J60
12MISOData Out
11MOSIData In
13SCLKClock
8CSChip Select

Luckily there is no shortage of libraries for it! I counted at least four during my search but settled on two. The first I found was by one Doctor Monk and worked pretty well, the only problem being that it only provides a web-server, not a general TCP/IP stack. 

The next one was EtherCard from JeeLabs which is downloadable at GitHub. Although it modestly claims to be a work-in-progress, it ships with fully 15 examples demonstrating everything from DHCP and DNS to Twitter and Pachube. The only gotcha I found with it was that its examples use pin 8 on the Arduino for Chip Select and I had been using pin 10 previously for this.

Friday, 14 September 2012

Interval Handling on Arduino

When designing devices which never reset and which need to be aware of time, one thing to beware of is the millisecond timer rolling over. According to the reference manual, this happens after about 50 days. If your device is designed to be powered on for short periods of time and happens to be on while this timer overflows, then it will fail to power off and you'll have to power-cycle it.
This little class avoids this problem by watching for the overflow and calculating the interval correctly.

Saturday, 1 September 2012

USB IR Receiver


This is a little USB infrared receiver based on an original design by Ben Ryves. It pretends to be a USB keyboard and works by mapping NEC IR codes to keystrokes --- controlling the chosen application through its keyboard shortcuts. (VLC is a good choice of application because it's possible to change its shortcuts to match the ones sent by the receiver.)

I slightly simplified the hardware removing a switch which the original used to send different sets of key-codes, for two applications without programmable shortcuts. The modified circuit diagram is below.
(Note that the circuit must run at 12 MHz. I think this was due to the timing of the IR reception routine.)

I also simplified the software, removing a detection routine for the SIRCS protocol. Ben's original software is here, while my modifications are here.  The USB stack is V-USB: this is a nice simple example of getting started with it.

The software detects codes sent by a Newsky DVB-T remote control, seen below.
An easy way to discover the type of your remote control and the codes it sends, is with Ken Shirriff's handy IR library for Arduino; use the IRrecvDump sketch.

Tuesday, 17 July 2012

Frankenstein's Thermometer Mk2

Well it's been just over a year since this blog started and what better way to celebrate than revising an old project? I'd had a look at Frankenstein's thermometer before, using a neat trick with a mono jack plug and a stereo socket to switch the power. However I wasn't really pleased with this arrangement, because it separated the thermistor from the main box when it wasn't in use.

The idea was to upgrade the firmware to put the ATtiny into deep sleep after a short time. The complete code is now:

The main additions are:
  • the sleep() routine which causes the ATtiny to enter a power-down mode,
  • the PCINT1_vect which wakes it up again when the push-button is pressed.
The port PB1, which the push-button connects to ground, generates PCINT9. On the ATtiny84, there are two pin-change interrupts, PCINT0 and PCINT1. The former handles pin change signals on Port A, while the latter handles those from Port B. Our handler simply checks whether the interrupt has woken us up, or was to change the units of temperature.

The sleep routine switches off all of the LEDs and the ADC before putting the ATtiny to sleep. When it wakes up again, the ADC must be re-enabled.

With the new software installed,  the device consumes about 11mA when on but 0.16mA when off. With a nominal capacity of 1000mAh, this would drain the batteries in about 6000 hours (or 250 days). This was a bit surprising, as was the discovery that this current was still drawn when the AVR was removed altogether. This indicated that the source of the drain was the voltage divider comprising the thermistor and a 10k resistor. (See the circuit diagram in the original posting.) At room temperature, the current drawn would be 3v/20k or 0.15mA.

Rather than complicate the circuit with a MOSFET switch, we decided simply to increase the value of the bias resistor from 10k to 47k. This reduced the current by a factor of 4 increasing the battery life to over 2 years. (The calculation of the Thermistor equation has been cleaned up a bit too: the original made the assumption that the 10k resistor would cancel the thermistor's resistance at 25C.)

Thursday, 5 July 2012

Pulse Width Modulation

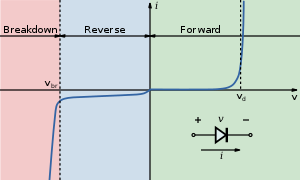
The LED is an interesting beast and dimming one is an interesting problem. Unlike an incandescent bulb, simply changing the voltage across it does not work. The diagram below shows why: its I-V curve is almost vertical around Vd and any lower voltage will cause it to turn off. (It's also why a current-limiting resistor is essential: connecting it to a supply even slightly greater than Vd will cause a huge current to flow, destroying it with a pop.)


In the analog world, varying the brightness of an LED might be achieved with a dependent current-source, involving an op-amp perhaps. However in the digital world of this blog, the only way is to vary a square-wave's duty-cycle (the ratio of on-time to off-time) quickly enough for flickering to be indistinguishable to the eye, so the average brightness is perceived. This method is known as pulse-width modulation or PWM.

On Arduino, PWM is achieved in hardware using the analogWrite() function. Confusingly this does not use the analog input pins, but a subset of the digital I/O pins. However analogWrite() provides limited control, for one thing the frequency is fixed; should more control be required you have to go under the Arduino API (this excellent tutorial has the answers).

Although the ATtiny85 also has hardware PWM, your author was unable to make it work without flicker using the ATtiny Arduino core, probably because the internal oscillator was running too slowly at 1MHz. Software bit-banging, as shown in the following sketch, did work well enough at this frequency.

By varying the duty-cycle from low to high and back again, this little sketch brightens and dims an LED attached to the desired pin in a manner similar to Apple's breathing LED. Varying the delay parameter also allows control over the rate of breathing.