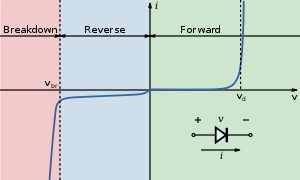
The LED is an interesting beast and dimming one is an interesting problem. Unlike an incandescent bulb, simply changing the voltage across it does not work. The diagram below shows why: its I-V curve is almost vertical around Vd and any lower voltage will cause it to turn off. (It's also why a current-limiting resistor is essential: connecting it to a supply even slightly greater than Vd will cause a huge current to flow, destroying it with a pop.)
In the analog world, varying the brightness of an LED might be achieved with a dependent current-source, involving an op-amp perhaps. However in the digital world of this blog, the only way is to vary a square-wave's duty-cycle (the ratio of on-time to off-time) quickly enough for flickering to be indistinguishable to the eye, so the average brightness is perceived. This method is known as pulse-width modulation or PWM.
On Arduino, PWM is achieved in hardware using the analogWrite() function. Confusingly this does not use the analog input pins, but a subset of the digital I/O pins. However analogWrite() provides limited control, for one thing the frequency is fixed; should more control be required you have to go under the Arduino API (this excellent tutorial has the answers).
Although the ATtiny85 also has hardware PWM, your author was unable to make it work without flicker using the ATtiny Arduino core, probably because the internal oscillator was running too slowly at 1MHz. Software bit-banging, as shown in the following sketch, did work well enough at this frequency.
By varying the duty-cycle from low to high and back again, this little sketch brightens and dims an LED attached to the desired pin in a manner similar to Apple's breathing LED. Varying the delay parameter also allows control over the rate of breathing.
No comments:
Post a Comment