Wednesday 25 May 2011

One-Wire Mains Switch


The schematic shows a one-wire controlled mains switch. One-wire is a simple protocol which is typically used for networks of temperature sensors. (The diagram is a simplified version of a circuit by Simon Atkins.)

Features of this circuit are:
  • The diodes on the left provide surge protection, for those occasions when your network is hit by lightning.
  • The DS2406 is active-low, the LED is entirely optional.
  • The RC pair at the far right is called a snubber. It is used for inductive loads (e.g., electric motors) when the current is out of phase with the voltage. The resistor should be rated at 1W and the capacitor 400v.
  • The resistor R3 is required to limit the current through the opto-isolator during the instant of time when it is conductive but before the triac has switched on.

Frankenstein's Thermometer, redux

Finally managed to find a diagramming program I didn't dislike: a freeware version of Eagle. It produced the following circuit diagram for the thermometer:

There's not too much to say about that circuit, except that an ATtiny24 probably doesn't have enough storage to run the program. I used an -84. (Note that I don't think that arduino-tiny supports -44 chips yet.)


Here's a picture of the finished "product" in mid-measure:

It runs on two AAA batteries.

Thursday 19 May 2011

It's the little things


One of the first lessons learned by anyone attempting to cook even a moderately complicated meal is do as much preparation as possible. The fewer steps which remain at runtime (as it were) the fewer the opportunities to poison guests.

As with cookery, so with hardware. Frequently-used subsystems, built and tested independently, are an invaluable aid to rapid prototyping. The picture above shows three:
  1. A power cable to carry +5v from the development board to the breadboard,
  2. A breakout board for a magnetic sensor, implementing the manufacturer's suggested circuit,
  3. An LED with 470R resistor in series (why don't manufacturers just sell these?)

Tuesday 10 May 2011

In-System Programming


This post describes how to use an Arduino (or compatible, as described earlier) to program an AVR, specifically the ATtiny84. I used this page as a starting-point, although it talks about programming an ATmega, the principle is the same.

I chose the ATtiny because it is a convenient package for standalone applications (14-pin DIL) yet provides 8k of flash and lots of I/O (up to 12 pins).

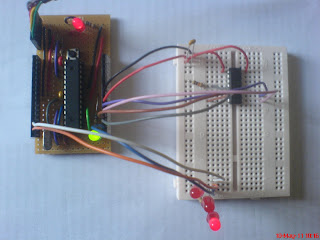
The first step is to download mega-isp into the Arduino IDE and upload it to the Arduino, thus turning it into an ISP. Then wire up the ATtiny as shown in the picture above. The connections between the Arduino and the ATtiny are as follows:


ArduinoATtinyATMegaName
1417Vcc
16148Gnd
13919SCK
12818MISO
11717MOSI
1041/RESET

Also connect the reset pin to Vcc via a 10k resistor and don't forget the 100nF capacitor between Vcc and Gnd.

Status LEDs can optionally be connected as follows:

ArduinoFunction
9Heartbeat
8Error
7Programming

Out of the box, the Arduino IDE supports only ATmega chips. To rectify this, download and install arduino-tiny. Then start the IDE, select Tools > Board > ATtiny @ 1MHz, and compile the sketch to be written to it.

Next, open a shell, find the IDE's working directory (on Linux this is somewhere like /tmp/build8471417854754086173.tmp) and cd into it. Run the following command:
$ avrdude -P /dev/ttyUSB0 -b 19200 -c avrisp -p t84 -U flash:w:Blink.cpp.hex:i
This command writes the output of the compiler (Blink.cpp.hex) at the given baud-rate (19200) to the ISP on the specified port (/dev/ttyUSB0) for the specified part (t84, for an ATMega, m328p). If successful, its output should look something like this:

$ avrdude -P /dev/ttyUSB0 -b 19200 -c avrisp -p t84 -U flash:w:Blink.cpp.hex:i

avrdude: please define PAGEL and BS2 signals in the configuration file for part ATtiny84
avrdude: AVR device initialized and ready to accept instructions

Reading | ################################################## | 100% 0.04s

avrdude: Device signature = 0x1e930c
avrdude: NOTE: FLASH memory has been specified, an erase cycle will be performed
To disable this feature, specify the -D option.
avrdude: erasing chip
avrdude: please define PAGEL and BS2 signals in the configuration file for part ATtiny84
avrdude: reading input file "Blink.cpp.hex"
avrdude: writing flash (752 bytes):

Writing | ################################################## | 100% 1.53s

avrdude: 752 bytes of flash written
avrdude: verifying flash memory against Blink.cpp.hex:
avrdude: load data flash data from input file Blink.cpp.hex:
avrdude: input file Blink.cpp.hex contains 752 bytes
avrdude: reading on-chip flash data:

Reading | ################################################## | 100% 1.35s

avrdude: verifying ...
avrdude: 752 bytes of flash verified

avrdude: safemode: Fuses OK

avrdude done. Thank you.

The ISP's LEDs will blink during this process and the ATtiny will restart when the process has completed, running the newly uploaded sketch.

Note that this does not burn the Arduino bootloader to the chip. Modifications to the sketch require this procedure to be repeated, which is rather laborious.

Thursday 5 May 2011

Frankenstein's Thermometer

Not much more complicated than the simplest thing you can do with an Arduino is measure and display temperature. The picture shows such a device at the embryo stage.

The parts' list for this is:
  • 3x10k
  • 10k NTC thermistor (beta = 3977)
  • 100nF ceramic capacitor
  • 7x470R
  • Pushbutton switch
  • 7-segment LED display (common cathode)
The measurement is performed by a 10k resistor and the thermistor at the top of the picture. This is read by the Arduino on A5 and converted using the thermistor equation.

Each digit of the result is output on digital pins 2-8 in turn. A resistor is required for each segment of the display because otherwise the total current through the display would have to be shared between all of the lit segments; use whichever resistor-decade you have most of.

Finally, digital pin 9 is used to sense the state of the pushbutton. This allows cycling between centigrade, fahrenheit and the absolute temperature scale.

This circuit can be powered by 3v and draws between 15 and 30mA, depending on the digit displayed, indicating that the display is consuming the majority of the power. Thus, a couple of alkaline AAA cells would power this circuit for about 3 days.

If the thermistor is disconnected entirely, it displays -273C, which is nice.

Fritzing is here.


Homebrew Arduino development board

Inspired by Romilly's veroduino but requiring some hand-holding to get me started, I happened upon Oomlout's Component Bundle for Arduino Compatible --- I already had some breadboard lying around. While I was there I picked up a USB-Serial cable (which you need in order to actually program the thing).

Having assembled the kit by following the instructions for the BBAC (hint: you can use plain wire instead of 0-ohm resistors!) and tested that it was working (mostly: the cable is too heavy for the serial port header on the breadboard, it kept pulling it loose, making it next to impossible to download sketches), I decided that the thing would need a permanent home: stripboard (or veroboard as it used to be called).

Here are the bits required for a minimal development board:
  • 6-way male header
  • 2x10k
  • pushbutton (reset)
  • 2x16-way female header (14-way would do but that's all bitsbox had)
  • 16MHz crystal
  • 100nF ceramic
  • 2x22pF ceramic
  • 28-pin DIL socket
  • ATMega328 flashed with Arduino bootloader
  • Stripboard 26 lines x 15 holes
I left off the 5v DC converter circuit because the board gets its power from the host PC, via the serial cable. At your option you may wish to add a power LED, or an additional LED on pin 13, for the 'blink' demo. (The BBAC shows how to wire each of these.)

Once you have this wired up, your breadboard is freed-up for actual experimentation!

The board assembled: